How do I take apart a Moen shower head? This comprehensive guide provides a detailed walkthrough, from identifying your specific model to reassembling it perfectly. Understanding the various Moen shower head types, gathering the necessary tools, and following the step-by-step disassembly process is crucial for a successful repair or replacement. This guide is your ultimate resource for a smooth and hassle-free shower head overhaul.
This detailed guide walks you through each step of disassembling your Moen showerhead, from initial identification to final reassembly. We’ll explore the different models, necessary tools, and the precise sequence for taking apart and putting back together each component, ensuring proper functionality and preventing damage. Safety precautions are emphasized throughout.
Identifying the Shower Head Model
Knowing your Moen shower head model is crucial for troubleshooting, maintenance, and ordering replacement parts. Understanding the different types and features can help you choose the right shower experience for your needs. This section provides detailed descriptions of various Moen shower head models, highlighting their design and construction differences, and offers a comparative table to aid in identification.Moen offers a wide range of shower head styles, each with unique features.
These include the popular rain shower heads, handheld shower heads, and a variety of other options that provide different water pressure and spray patterns. Understanding these variations can enhance your shower experience and make maintenance easier.
Shower Head Model Variations
Different Moen shower head models are designed with various spray patterns and features. Rain shower heads, for instance, typically feature a large, flat spray face, simulating a rainfall experience. Handheld shower heads offer flexibility and targeted water control. The specific design and construction of these models can differ significantly.
Comparing Moen Shower Head Types
The following table provides a comparative overview of different Moen shower head types, their features, materials, and assembly considerations.
| Shower Head Type | Features | Materials | Assembly Considerations |
|---|---|---|---|
| Rain | Wide spray coverage, often with multiple nozzles for a diffused, invigorating shower experience. Some models offer adjustable spray patterns. | Typically made of brass or high-quality plastic, with options for chrome, brushed nickel, or other finishes. Nozzles might be made of different materials like silicone or ABS. | Rain shower heads typically have a single connection point, often a standard shower arm connection. Installation might require connecting the shower arm to the existing plumbing. |
| Handheld | Provides targeted water coverage and allows for adjusting the spray intensity and direction. Often features a detachable design. | Similar to rain heads, materials can include brass, plastic, or a combination of materials. Finishes vary. | Handheld shower heads are usually connected to a shower arm or a separate hose. Disassembly and reassembly might involve removing and replacing parts. |
| Combination (Rain/Handheld) | Combine the features of both rain and handheld shower heads, allowing users to switch between a full-body and targeted spray. | The materials depend on the specific model and may use different materials for different parts. Finish options will be available. | Combination models require more complex assembly as they integrate both rain and handheld features. |
Identifying Your Specific Model
To accurately identify your Moen shower head model, check the product label or the installation instructions. Look for a model number, which will help you find detailed specifications and diagrams. If you cannot locate the label, consider contacting Moen customer service for assistance, providing the shower head’s general features and style to help them guide you to the correct model.
This will streamline the process of obtaining the correct information.
Gathering Tools and Materials
Taking apart your Moen showerhead for cleaning or replacement requires the right tools. This section Artikels the essential equipment, ensuring a smooth and efficient process. A well-prepared toolkit minimizes potential damage to the showerhead and maximizes the chances of a successful repair or upgrade.
Disassembling a Moen showerhead involves a few simple steps, typically starting with unscrewing the retaining rings. While researching this, I stumbled upon a fascinating lorann oil hard candy recipe lorann oil hard candy recipe , which sparked a creative idea for a flavored shower experience. Ultimately, though, a thorough guide on taking apart a Moen showerhead will provide a more straightforward method for achieving a sparkling clean showerhead.
Essential Tools
Proper tools are crucial for safe and effective disassembly. Improper tools can damage delicate parts and lead to a less-than-desirable outcome. Careful selection and use of the tools listed below will minimize such risks.
| Tool | Description | Use |
|---|---|---|
| Adjustable Wrench | A wrench with adjustable jaws, allowing it to fit various nut sizes. Look for a wrench with a comfortable grip and sufficient leverage for tightening or loosening. | Used to loosen or tighten nuts and bolts holding the showerhead components together. This is particularly useful for removing the showerhead body from the arm. |
| Screwdriver (Phillips and Flathead) | A Phillips head screwdriver for Phillips-head screws, and a flathead screwdriver for flat-head screws. Ensure the screwdrivers are in good condition, with sharp tips to prevent stripping screws. | Used to remove screws that secure various parts of the showerhead, like the spray nozzles or the body to the arm. The type of screw head dictates the type of screwdriver needed. |
| Needle-nose Pliers | Pliers with a narrow, pointed tip, ideal for gripping small objects. | Helpful in grasping and removing small parts, such as clips or small retaining components that might be difficult to access with other tools. |
| Utility Knife (or Box Cutter) | A utility knife with a sharp blade for cutting and prying. | Occasionally, a utility knife may be needed to carefully cut through seals or adhesive that might be holding components together. Use caution to avoid damaging the parts. |
| Cleaning Brush | A brush with soft bristles for cleaning the showerhead components and removing any mineral deposits. | Essential for cleaning the showerhead and its internal components, helping to restore its optimal performance. |
Essential Materials
Having the right materials on hand can save time and frustration during the repair process. They might be needed for replacements or to make sure you can perform the job efficiently and completely.
- Replacement O-rings or seals: If the showerhead is leaking, replacing worn-out seals can prevent further leaks and ensure proper water flow.
- New showerhead: If the showerhead is beyond repair, a new showerhead can be used to upgrade your shower experience.
- Pipe sealant: If you need to reassemble any plumbing components, pipe sealant will help ensure a watertight seal.
Disassembling the Shower Head: How Do I Take Apart A Moen Shower Head
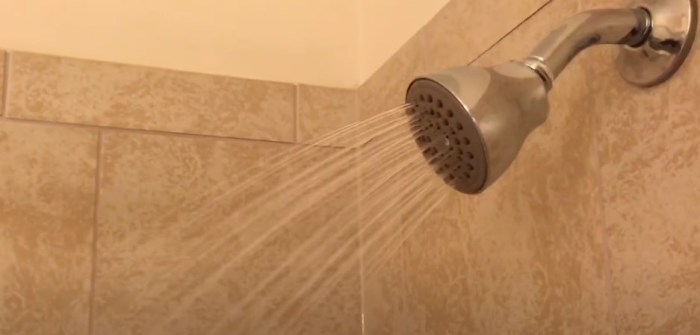
Taking apart your Moen shower head is a surprisingly straightforward process. Following these steps carefully, you can easily maintain your shower’s pristine performance and extend its lifespan. Remember, safety first! Always turn off the water supply before starting any disassembly.Understanding the internal structure of your shower head is key to a smooth and efficient disassembly. By carefully removing each component, you can effectively clean any buildup, potentially preventing clogs and maintaining optimal water flow.
Disassembly Steps
A methodical approach to disassembly minimizes the risk of damage and ensures you can reassemble the shower head correctly. This is crucial for maintaining the shower’s intended function and prolonging its life.
- Step 1: Shut Off the Water Supply. Before starting any plumbing work, turn off the water supply to the shower head. This is a fundamental safety precaution to prevent water damage and injury. Locate the shut-off valves, typically found near the water supply line to the shower. Completely close the valves to stop the water flow.
- Step 2: Remove the Shower Head from the Arm. Carefully unscrew the shower head from the shower arm. This is often a simple turn, but ensure you are using the appropriate tools, like a wrench if needed, to avoid damaging the connections. A common issue with this step is not turning the shower head completely to detach.
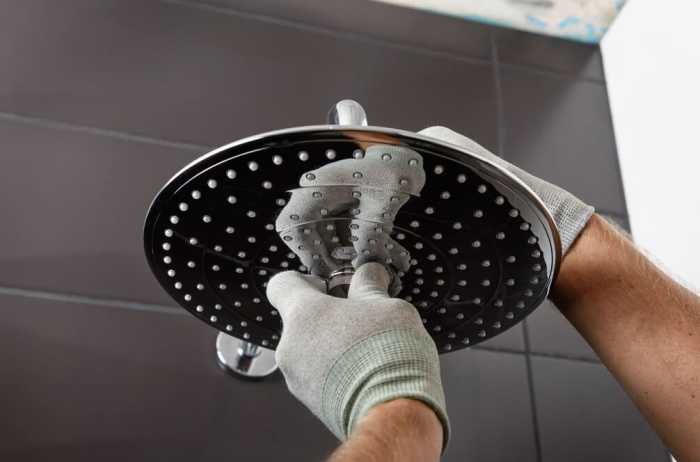
- Step 3: Detach the Spray Nozzles (if applicable). Some shower heads have removable spray nozzles or spray plates. Carefully disconnect these components. This step varies depending on the specific shower head design, so observe closely for specific connectors or clips holding them in place.
- Step 4: Separate the Body Components. Now, look for any connections between the shower head body parts. Some shower heads might have a retaining ring, clips, or screws that need to be removed to detach the different sections. This step requires careful observation to identify all connecting components.
- Step 5: Inspect for Buildup. Once disassembled, examine each part for mineral buildup or debris. Cleaning these parts with a soft brush and mild detergent will restore proper water flow. This preventive maintenance step can significantly extend the life of your shower head.
Visual Representation of Disassembled Shower Head
Imagine a shower head divided into sections. The first section is the nozzle, with one or more spray holes. Below this is a body section, which might have a filter or internal components. This body connects to the connector that attaches to the shower arm. The disassembled shower head would have each of these parts separated.
Each part would be visible for inspection and cleaning.
Troubleshooting and Maintenance
Maintaining your Moen shower head ensures a smooth, worry-free showering experience. Proper care extends the lifespan of your shower head and keeps it performing optimally. This section provides practical solutions for common issues, empowering you to handle minor problems yourself and saving you money on potential repairs.Common problems with Moen shower heads often stem from simple causes, which can be easily resolved.
This section provides actionable steps to tackle these issues, from minor clogs to more persistent leaks. Let’s dive into the practicalities of keeping your Moen shower head in tip-top shape.
Common Shower Head Issues and Solutions
Understanding the potential causes of shower head problems is crucial for effective maintenance. This section provides clear steps to identify and resolve issues, enabling you to enjoy a pristine showering experience.
- Leaks: Leaks in a shower head can be caused by a loose connection or a damaged gasket. This can lead to wasted water and potentially higher water bills. To fix a leak, carefully tighten the connections, replacing any damaged gaskets. If the leak persists, it might indicate a deeper issue, potentially requiring professional assistance.
- Clogs: Mineral deposits, hair, or soap scum can accumulate, creating clogs in the shower head. This obstructs water flow, reducing the shower’s effectiveness and potentially damaging the internal components. Regular cleaning can prevent clogs. Remove the shower head and thoroughly rinse it under running water. Use a soft brush to dislodge any trapped debris.
For stubborn clogs, a mixture of vinegar and water can be effective. Allow the mixture to sit for a few minutes before rinsing thoroughly.
- Reduced Water Pressure: A reduction in water pressure could be due to clogs, mineral buildup, or a problem with the plumbing system. Addressing the clogs and mineral buildup as mentioned in the previous point can improve the water pressure. If the issue persists, consider contacting a plumber to inspect the plumbing system.
- Unusual Noises: Unusual noises, such as dripping or clicking sounds, can signal a problem with the shower head’s internal components. If you hear any unusual noises, turn off the water supply and examine the shower head for any loose parts. If the issue persists, consult a qualified plumber to address the problem.
Preventive Maintenance Tips
Regular maintenance is key to preventing problems. Consistent cleaning and inspection can extend the life of your shower head and avoid costly repairs.
- Regular Cleaning: Regularly cleaning your shower head prevents clogs and buildup. This simple step can prevent major issues down the road. A quick rinse with water every few weeks can remove loose debris.
- Inspect for Damage: Regularly inspect the shower head for any visible damage, such as cracks or loose parts. Early detection can prevent more serious problems.
- Proper Storage: When not in use, store the shower head properly to protect it from damage.
Possible Causes and Solutions
| Possible Cause | Solution |
|---|---|
| Loose connections | Tighten all connections using appropriate tools. |
| Mineral buildup | Use a mixture of vinegar and water to dissolve deposits. |
| Clogs (hair, soap scum) | Dislodge clogs with a soft brush or a mixture of vinegar and water. |
| Damaged internal components | Replace the shower head. If the damage is significant, consult a plumber. |
Reassembling the Shower Head
Putting your shower head back together is a straightforward process that requires attention to detail and the right sequence. By following these steps, you can ensure your shower head functions optimally and provides a luxurious showering experience for years to come. Proper reassembly prevents leaks and ensures the longevity of your investment.
Correct Order of Assembly
The order in which components are reassembled is crucial. Improper sequence can lead to leaks, malfunction, or even damage to delicate parts. A methodical approach is essential to achieve a perfect reassembly.
- Begin by carefully aligning the shower head body with the diverter valve, ensuring proper seating. If necessary, use a small amount of plumber’s grease or Teflon tape to enhance the seal and prevent leaks.
- Once aligned, gently tighten the connecting nut. Avoid over-tightening, which could damage the threads or the shower head body. A slight resistance is ideal.
- Next, reattach the spray nozzles. Ensure they are seated securely in their respective grooves. The nozzles should be perfectly aligned, providing an even water flow.
- If applicable, carefully install the shower arm. Ensure it’s correctly positioned and the mounting nut is tightened to the specified torque.
Importance of Torque
Proper torque is essential when tightening components. Too much torque can strip threads or damage delicate parts, while too little torque may lead to leaks. Using a torque wrench ensures the appropriate tightness. Refer to your shower head’s manual for recommended torque specifications. For example, tightening a connection using 10 Nm ensures a secure and reliable seal without unnecessary stress on the components.
Diagram of Reassembly Process
(A diagram of the reassembly process is not provided in this text format, but it would be presented visually in a real document, with numbered steps showing each component placement and tightening sequence.)
Example of a Step:
- Step 1: Align the shower head body with the diverter valve (Diagram 1.1).
- Step 2: Tighten the connecting nut with a torque wrench (Diagram 1.2).
Additional Tips and Considerations
Maintaining your Moen shower head for optimal performance and longevity is key to enjoying a luxurious shower experience for years to come. These tips will empower you to keep your shower head in tip-top shape, preventing potential issues and maximizing its lifespan. Think of it as proactive shower head care – a little effort now saves you headaches (and potential costly repairs) later.Beyond the initial disassembly and reassembly, consistent care is crucial for the shower head’s long-term health.
By understanding the materials and potential environmental factors, you can proactively maintain peak performance. This section provides a practical guide to extending the life of your Moen shower head.
Disassembling a Moen showerhead often involves unscrewing components. Understanding the specific model’s design is crucial for a safe and efficient process. Before you start, research the procedure for your particular Moen showerhead. Meanwhile, if you’re considering life insurance, you might want to explore what EOI (expression of interest) means in this context. what is eoi for life insurance This knowledge will help you determine the best options for your needs.
Once you’ve grasped the concept of EOI, you can focus back on safely disassembling your Moen showerhead.
Shower Head Longevity and Performance
Proactive maintenance significantly impacts a shower head’s lifespan. Regular cleaning and attention to potential issues will prevent premature wear and tear. This includes a mindful approach to cleaning frequency, material compatibility, and water quality in your area. Understanding these factors allows you to tailor your care routine to your specific circumstances.
Preventing Future Issues
Regular maintenance is your best defense against shower head problems. By addressing potential issues promptly, you can prevent more significant and costly repairs down the road. This proactive approach includes recognizing early signs of wear and tear, ensuring proper water pressure, and understanding your local water quality.
Best Practices for Cleaning the Shower Head, How do i take apart a moen shower head
Proper cleaning techniques are crucial for maintaining a shower head’s functionality and aesthetic appeal. Regular cleaning prevents mineral buildup and ensures optimal water flow. This proactive approach involves the use of suitable cleaning agents and the avoidance of harsh chemicals that could damage the shower head’s finish.
Cleaning Frequency
How often you clean your shower head depends on your water quality. Hard water areas may require more frequent cleaning than areas with soft water. As a general guideline, aim for monthly cleaning in moderate water hardness areas and bi-monthly cleaning in areas with hard water. This schedule can be adjusted based on the observed buildup on your shower head.
Cleaning Materials and Methods
For most Moen shower heads, a mixture of warm water and mild dish soap is effective. A soft-bristled brush or sponge is ideal for gently removing mineral deposits and debris. Avoid using abrasive cleaners or scouring pads, as these can scratch the finish. For particularly stubborn mineral buildup, consider using a vinegar solution. Always rinse thoroughly after cleaning to remove any residue.
Materials and Environments
Different Moen shower head materials react differently to various environments. Understanding these factors is key to maintaining the shower head’s longevity and avoiding potential damage.
| Material | Suitability for Environments |
|---|---|
| Brass | Generally suitable for most environments, but susceptible to corrosion in extremely harsh conditions or with highly acidic water. |
| Chrome | Resistant to most environmental factors, but can be susceptible to scratches if not handled carefully. |
| Stainless Steel | Highly durable and resistant to corrosion, making it suitable for various water conditions. |
Understanding the material of your shower head and the water quality in your area is critical. This knowledge allows you to tailor your cleaning routine and maintenance schedule for optimal results.
Summary
Successfully disassembling and reassembling your Moen shower head requires careful attention to detail and adherence to the provided steps. By following this guide, you’ll not only master the process but also gain valuable insights into shower head maintenance and troubleshooting. Remember to always prioritize safety and use the appropriate tools for optimal results. Your shower will thank you for it!
FAQ
What tools are essential for disassembling a Moen shower head?
You’ll likely need an adjustable wrench, a screwdriver (Phillips or flathead, depending on the model), and possibly pliers. Always double-check the specific tools required based on your model.
What should I do if I encounter a leak after disassembling the shower head?
Check for loose connections and ensure all components are properly tightened. If the leak persists, you might need to replace a damaged gasket or O-ring.
How can I prevent future clogs in my shower head?
Regular cleaning and descaling with a mild cleaner can help prevent clogs. Avoid using harsh chemicals that could damage the shower head’s finish.
Can I replace parts of a Moen shower head without replacing the entire unit?
Often, yes. Many Moen shower heads are designed with replaceable parts like nozzles, spray plates, and gaskets. This can extend the life of your shower head significantly.
